Vue3中Vuex状态管理库学习笔记(一)
2019ab/CSDN发表于:2024-05-13 15:25:43浏览:154次
1.什么是状态管理
在开发中,我们会的应用程序需要处理各种各样的数据,这些数据需要保存在我们应用程序的某个位置,对于这些数据的管理我们就称之为状态管理。
在之前我们如何管理自己的状态呢?
- 在Vue开发中,我们使用组件化的开发方式;
- 在组件中我们定义data或者在setup中返回使用的数据,这些数据我们称之为state;
- 在模块template中我们可以使用这些数据,模块最终会被渲染成DOM,我们称之为View;
- 在模块中我们会产生一些行为事件,处理这些行为事件时,有可能会修改state,这些行为我们称之为actions;
2.Vuex的状态管理
管理不断变化的state本身也是非常困难的:
- 状态之间相互会存在依赖,一个状态的变化会引起另一个状态的变化,View页面也有可能引起状态的变化;
- 当应用程序复杂时,state在什么时候,因为什么原因发生了变化,发生了怎么样的变化,会变得非常难以控制和追踪;
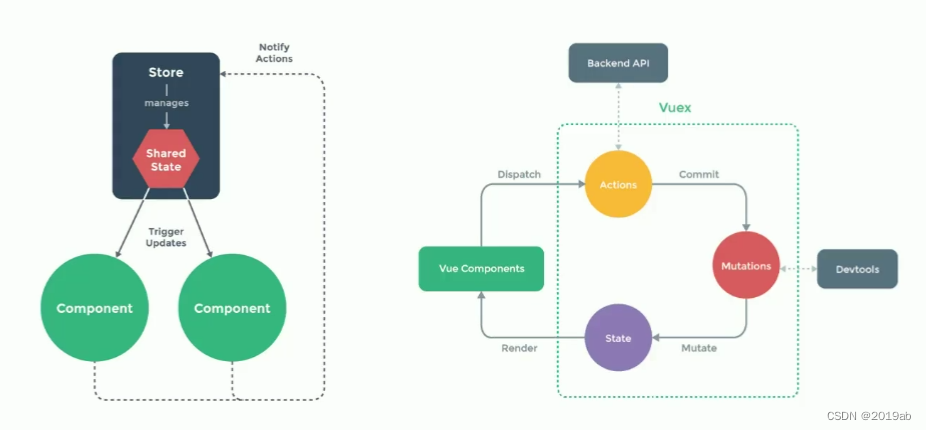
因此,我们是否可以考虑将组件的内部状态抽离出来,以一个全局单例的方式来管理呢? - 在这种模式下,我们的组件树构成了一个巨大的 “试图View”;
- 不管在树的那个位置,任何组件都能获取状态或者触发行为;
- 通过定义和隔离状态管理中的各个概念,并通过强制性的规则来维护视图和状态间的独立性,我们的代码便会变得更加结构化和易于维护,跟踪;
这就是Vuex背后的基本思想,它借鉴了Flux,Redux,Elm(纯函数语言,redux有借鉴它的思想);
当然,目前Vue官网也在推荐使用Pinia进行状态管理,我后续也会进行学习。
3.Vuex的状态管理
4.Vuex的安装
npm install vuex
5.Vuex的使用
在src目录下新建store目录,store目录下新建index.js,内容如下
import { createStore } from "vuex";

const store = createStore({
  state:() => ({
    counter:100
  })
})

export default store
在main.js中引用
import { createApp } from 'vue'
import App from './App.vue'
import store from './store'

createApp(App).use(store).mount('#app')
App.vue中使用
<template>
  <div class="app">
    <h2>App当前计数:{{ $store.state.counter }}</h2>
    <HomeCom></HomeCom>
  </div>
</template>

<script setup>
  import HomeCom from './views/HomeCom.vue'
</script>

<style>
</style>
6.创建Store
每一个Vuex应用的核心就是store(仓库):
- store本质上是一个容器,它包含着你的应用中大部分的状态(state);
Vuex和单纯的全局对象有什么区别呢?
- Vuex的状态存储是响应式的
- 当Vue组件从store中读取状态的时候,若store中的状态发生变化,那么相应的组件也会被更新;
- 你不能直接改变store中的状态
- 改变store中的状态的唯一途径就是显示提交(commit)mutation;
- 这样使得我们可以方便的跟踪每一个状态的变化,从而让我们能够通过一些工具帮助我们更好的管理应用的状态;
使用步骤:
- 创建Store对象;
- 在app中通过插件安装;
HomeCom.vue
<template>
  <div>
    <h2>Home当前计数:{{  $store.state.counter }}</h2>
    <button @click="increment">+1</button>
  </div>
</template>

<script setup>
  import { useStore } from 'vuex';
  const store = useStore()

  function increment(){
    // store.state.counter++
    store.commit("increment")
  }
</script>

<style scoped>

</style>
store/index.js
import { createStore } from "vuex";

const store = createStore({
  state:() => ({
    counter:100
  }),
  mutations:{
    increment(state){
      state.counter++
    }
  }
})

export default store
7.在computed中使用Vuex
options-api
<h2>Computed当前计数:{{ storeCounter }}</h2>
<script>
  export default{
    computed:{
      storeCounter(){
        return this.$store.state.counter
      }
    }
  }
</script>
Componsition-API
<h2>Componsition-API中Computed当前计数:{{ counter }}</h2>
 const store = useStore()
  // const setupCounter = store.state.counter; // 不是响应式
  const { counter } = toRefs(store.state);
8.mapState函数
options-api中使用
    <!-- 普通使用 -->
    <div>name:{{ $store.state.name }}</div>
    <div>level:{{ $store.state.level }}</div>
    <!-- mapState数组方式 -->
    <div>name:{{ name }}</div>
    <div>level:{{ level }}</div>
    <!-- mapState对象方式 -->
    <div>name:{{ sName }}</div>
    <div>level:{{ sLevel }}</div>
<script>
  import { mapState } from 'vuex';
  export default {
    computed:{
      fullname(){
        return 'xxx'
      },
      ...mapState(["name","level"]),
      ...mapState({
        sName:state => state.name,
        sLevel:state => state.level
      })
    }
  }
</script>
Componsition-API
  <!-- Setup中  mapState对象方式 -->
    <!-- <div>name:{{ cName }}</div>
    <div>level:{{ cLevel }}</div> -->

    <!-- Setup中 使用useState -->
    <div>name:{{ name }}</div>
    <div>level:{{ level }}</div>

    <button @click="incrementLevel">修改level</button>
<script setup>
  // import { computed } from 'vue';
  // import { mapState,useStore } from 'vuex';
  import { useStore } from 'vuex';
// import useState from '../hooks/useState'
import { toRefs } from 'vue';

  // 1.一步步完成
  // const { name,level } = mapState(["name","level"])
  // const store = useStore()
  // const cName = computed(name.bind({ $store:store }))
  // const cLevel = computed(level.bind({ $store:store }))

  // 2. 使用useState
  // const { name,level } = useState(["name","level"])

  // 3.直接对store.state进行结构(推荐)
  const store = useStore()
  const { name,level } = toRefs(store.state)

  function incrementLevel(){
    store.state.level++
  }
</script>
hooks/useState.js
import { computed } from "vue";
import { useStore,mapState } from "vuex";

export default function useState(mapper){
  const store = useStore()
  const stateFnsObj = mapState(mapper)

  const newState = {}
  Object.keys(stateFnsObj).forEach(key=>{
    newState[key] = computed(stateFnsObj[key].bind({$store:store}))
  })

  return newState
}
9.getters的基本使用
某些属性可能需要经过变化后来使用,这个时候可以使用getters:
import { createStore } from "vuex";

const store = createStore({
  state:() => ({
    counter:100,
    name:'why',
    level:10,
    users:[
      {id:111,name:'why',age:20},
      {id:112,name:'kobe',age:30},
      {id:113,name:'james',age:25},
    ]
  }),
  mutations:{
    increment(state){
      state.counter++
    }
  },
  getters:{
    doubleCounter(state){
      return state.counter * 2
    },
    totalAge(state){
      return state.users.reduce((preValue,item)=>{
        return preValue + item.age
      },0)
    },
    message(state){
      return `name:${state.name} level:${state.level}`
    }
  }
})

export default store
获取
<template>
  <div>
   <button @click="incrementLevel">修改level</button>
   <h2>doubleCounter:{{ $store.getters.doubleCounter }}</h2>
   <h2>usertotalAge:{{ $store.getters.totalAge }}</h2>
   <h2>message:{{ $store.getters.message }}</h2>
  </div>
</template>

<script>
  export default {

  }
</script>
<script setup>

</script>

<style scoped>

</style>
注意,getter是可以返回函数的
 // 获取某一个frends,是可以返回函数的
    getFriendById(state){
      return (id) => {
        const friend = state.friends.find(item=>item.id == id)
        return friend;
      }
    }
使用
<h2>friend-111:{{ $store.getters.getFriendById(111) }}</h2>
mapGetters的辅助函数
我们可以使用mapGetters的辅助函数
options api用法
<script>
  import { mapGetters } from 'vuex';
  export default {
    computed:{
      // 数组语法
      // ...mapGetters(["doubleCounter","totalAge","message"]),
      // 对象语法
      ...mapGetters({
        doubleCounter:"doubleCounter",
        totalAge:"totalAge",
        message:"message"}),
      ...mapGetters(["getFriendById"])
    }
  }
</script>
Composition-API中使用mapGetters
<script setup>
   import { toRefs } from 'vue';
  //  computed
  import { useStore } from 'vuex';
  // mapGetters
  const store = useStore();

// 方式一
// const { message:messageFn } = mapGetters(["message"])
// const message = computed(messageFn.bind({ $store:store }))
// 方式二
const { message } = toRefs(store.getters)
function changeAge(){
  store.state.name = "coder why"
}
// 3.针对某一个getters属性使用computed
const message = computed(()=> store.getters.message)
function changeAge(){
  store.state.name = "coder why"
}
</script>
10. Mutation基本使用
更改Vuex的store中的状态的唯一方法是提交mutation:
mutations:{
    increment(state){
        state.counter++
    },
    decrement(state){
       state.counter--
     }
}
使用示例
store/index.js
import { createStore } from "vuex";

const store = createStore({
  state:() => ({
    counter:100,
    name:'why',
    level:10,
    users:[
      {id:111,name:'why',age:20},
      {id:112,name:'kobe',age:30},
      {id:113,name:'james',age:25},
    ],
    friends:[
      {id:111,name:'why',age:20},
      {id:112,name:'kobe',age:30},
      {id:113,name:'james',age:25},
    ]
  }),
  getters:{
    doubleCounter(state){
      return state.counter * 2
    },
    totalAge(state){
      return state.users.reduce((preValue,item)=>{
        return preValue + item.age
      },0)
    },
    message(state){
      return `name:${state.name} level:${state.level}`
    },
    // 获取某一个frends,是可以返回函数的
    getFriendById(state){
      return (id) => {
        const friend = state.friends.find(item=>item.id == id)
        return friend;
      }
    }
  },
  mutations: {
    increment(state){
      state.counter++
    },
    changeName(state){
      state.name = "王小波"
    },
    changeLevel(state){
      state.level++
    },
    changeInfo(state,userInfo){
      state.name = userInfo.name;
      state.level = userInfo.level
    }
  },
})

export default store
<template>
  <div>
   <button @click="changeName">修改name</button>
   <h2>Store Name:{{ $store.state.name }}</h2>
   <button @click="changeLevel">修改level</button>
   <h2>Store Level:{{ $store.state.level }}</h2>
   <button @click="changeInfo">修改level和name</button>
  </div>
</template>

<script>
  export default {
    methods:{
      changeName(){
        console.log("changeName")
        // // 不符合规范
        // this.$store.state.name = "李银河"
        this.$store.commit("changeName")
      },
      changeLevel(){
        this.$store.commit("changeLevel")
      },
      changeInfo(){
        this.$store.commit("changeInfo",{name:'张三',level:'100'});
      }
    }
  }
</script>

<style scoped>

</style>
Mutation常量类型
1.定义常量 store/mutation-type.js
export const CHANGE_INFO = "CHANGE_INFO"
2.定义mutation
引入 store/index.js
import { CHANGE_INFO } from "./mutation_types";
[CHANGE_INFO](state,userInfo){
      state.name = userInfo.name;
      state.level = userInfo.level
   }
3.提交mutation
引入 HomeCom.vue
import {CHANGE_INFO } from "@/store/mutation_types"
changeInfo(){
        this.$store.commit(CHANGE_INFO,{name:'张三',level:'100'});
      }
感谢观看,我们下次见


